
Documentation in Laravel 8 with Enlighten
Oliver Earl • • 5 min read
Php Laravel Software EngineeringThe importance of software documentation, even in an agile world, is undisputed. Keeping documentation, especially for APIs, up-to-date however can be an additional burden on a development team, and thus automatically generated documentation can help supplement this by producing reference materials. This is where Enlighten comes in.
In this guide, we'll get Laravel Enlighten up-and-running, which utilises your existing PHPUnit tests (because you should be writing tests) to produce and publish beautiful, customisable documentation, without needing to run any additional commands.
System Requirements
Enlighten does require both PHP 7.4 and Laravel 8. I don't know whether it works with Lumen. If you're running anything earlier, such as Laravel 6 LTS, I would instead recommend Scribe. For other frameworks or vanilla PHP applications, try phpDocumentor.
You will also need a secondary database. It does not need to be a different kind of database, but it does need to be persistent.
You also need an up-to-date version of Git. This is unlikely to be a problem on macOS, Linux or Windows Subsystem for Linux, but it gave me some teething problems directly running on Windows 10 under Laragon.
Please also note that these are as simple installation instructions as possible. For troubleshooting and optional installation steps, please check the project's repository.
Installation
Composer installation
Do not use sudo for any of these commands. That will open a whole Pandora's box you don't want to deal with.
Using Composer, require Enlighten into your Laravel project using the following command. If you somehow don't have it, grab it here.
composer require styde/enlighten --dev
Registering the service provider
Next, add the following to your config/app.php file in order to register Enlighten's service provider. If you're not
sure where this needs to go, put it underneath the package service providers comment, like thus:
[
  'providers' => [
    // ...
    /*
     * Package Service Providers...
     */
     Styde\Enlighten\Providers\EnlightenServiceProvider::class,
    // ...
  ]
];
Important: Be sure to end the line in a comma, not a semicolon.
Publish assets to the public directory
Run the following command to publish Enlighten's assets to your public directory. Without this, any documents you
generate will lack any CSS formatting or JavaScript.
php artisan vendor:publish --tag=enlighten-build
Integrating Enlighten into your tests
In order for Enlighten to activate during testing and to have access to test data, it will need to be imported and
initialised during the setup phase of your tests. You can do this in your TestCase.php abstract class, or in
individual test files.
For example:
<?php

namespace Tests;

use Illuminate\Foundation\Testing\TestCase as BaseTestCase;
use Styde\Enlighten\Tests\EnlightenSetup; // import this trait

abstract class TestCase extends BaseTestCase
{
  use CreatesApplication;
  use EnlightenSetup; // and use said trait here

  protected function setUp(): void
  {
    parent::setUp();

    $this->setUpEnlighten(); // the final piece of the puzzle
  }
}
Important: I believe you need to still call parent::setUp() in your setUp() methods within your tests.
Setting up the secondary database
As aforementioned, Enlighten needs another database to record information. The easiest way to do this is to create
another database with the same name of your existing one, except with an _enlighten suffix.
For example, if you have used a MySQL database named laravel, you can create another one called laravel_enlighten
which will be used automatically. This assumes you're using the same database connection, credentials, and driver.
Once you've made it, run your migrations to get it set up:
php artisan migrate
The next optional section is for you should you need a different configuration.
Optional: Custom database setup
If you need to use something else, add a new entry to your config/database.php file with the name enlighten. This
can support a different driver, credentials, database name, etc. You can add this information as custom entries in
your .env file - possibly with an _ENLIGHTEN suffix for clarity.
For example:
'enlighten' => [
  'driver' => 'mysql',
  'host' => env('DB_HOST_ENLIGHTEN', '127.0.0.1')
  'port' => env('DB_PORT_ENLIGHTEN', '3306')
  'database' => env('DB_DATABASE_ENLIGHTEN', 'laravel_enlighten')
  'username' => env('DB_USERNAME_ENLIGHTEN', 'root')
  'password' => env('DB_PASSWORD_ENLIGHTEN', '')
// …
],
I think that you could use an SQLite database in theory, but I haven't tested this and generally stick to the defaults.
Don't forget to run your migrations if you chose this route.
php artisan migrate
Running Enlighten
Once you've set everything up, Enlighten will run when you run your test suite:
php artisan test
You can then find your new documentation at the yourwebsite.test/enlighten/ URL.
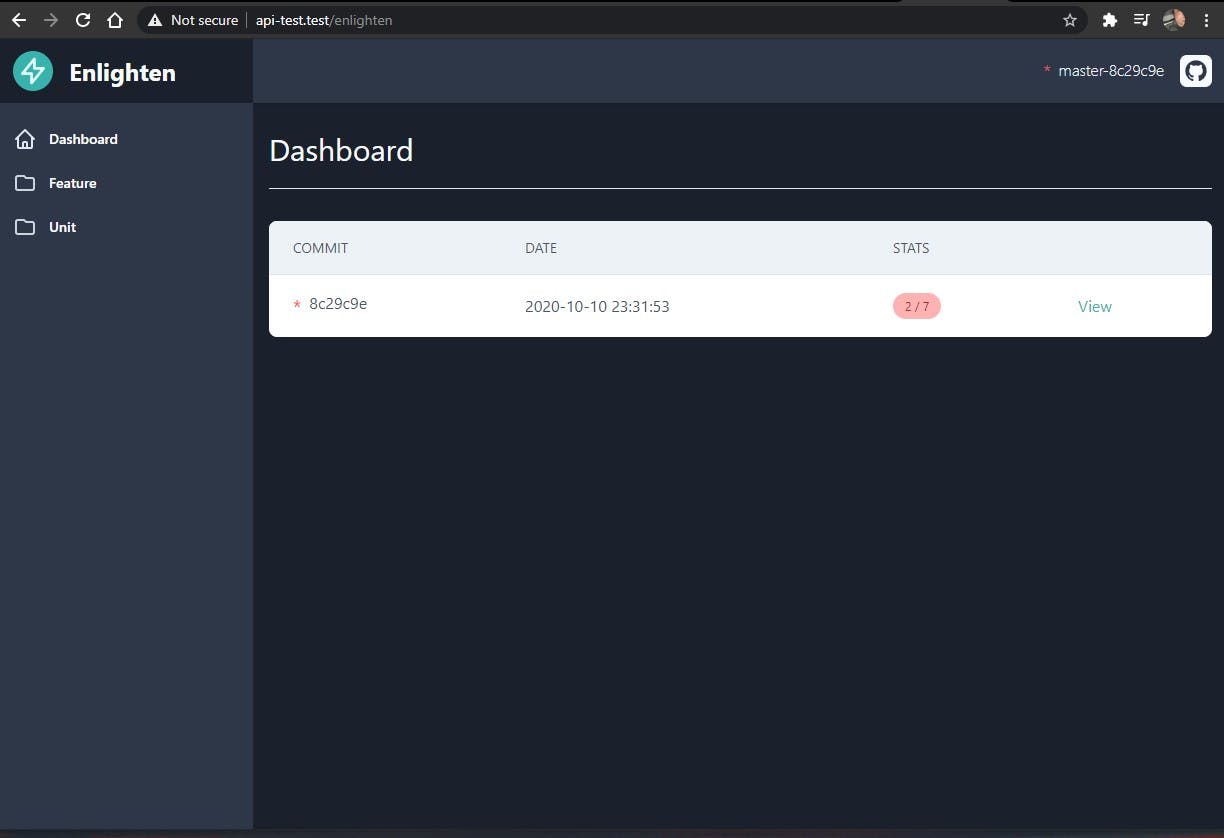
Here you can quickly see at a glance what feature and unit tests have passed or failed. Navigating to individual tests can show you more information, including headers, responses, and a screenshot of what was returned if it were HTML.
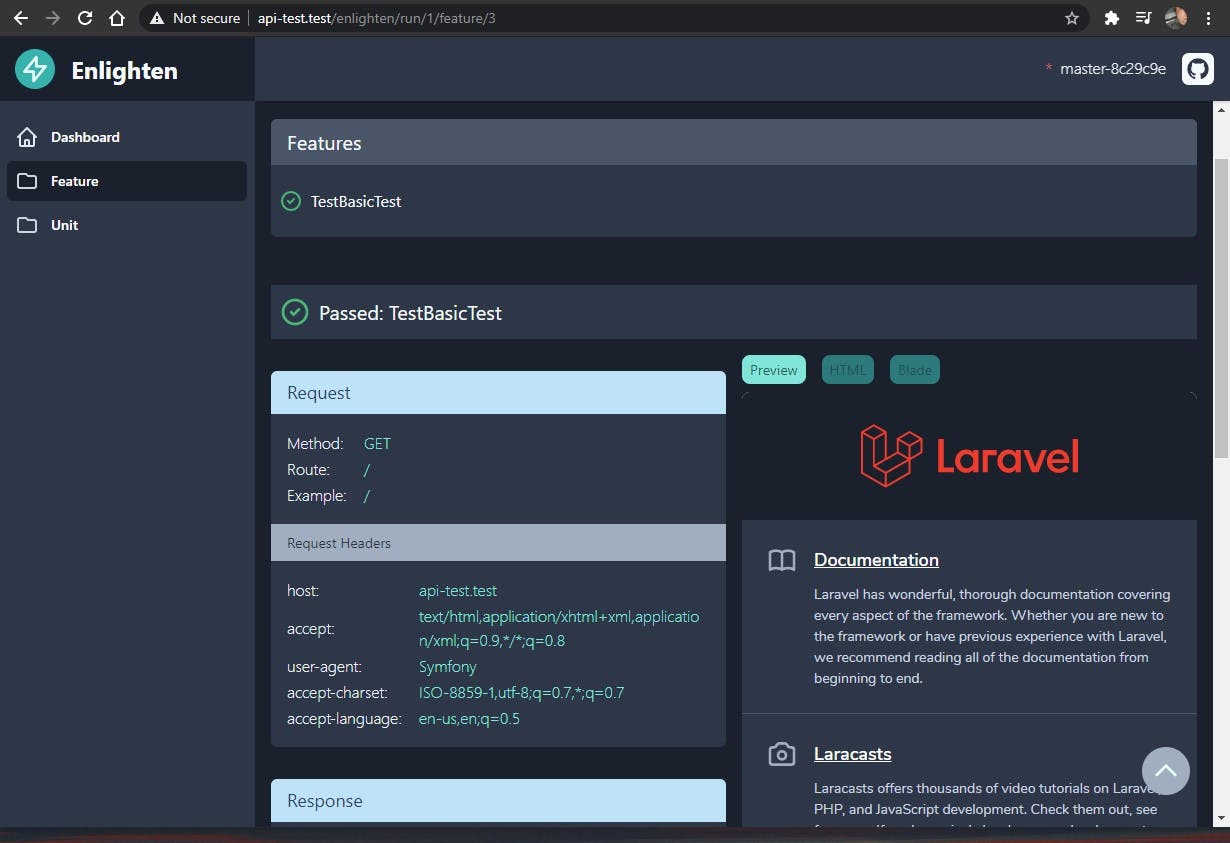
(This is just an example API project with very basic tests.)
What's next?
This guide was designed to get Enlighten up-and-running as easily as possible. More customisation and configuration options are available to make your documentation as detailed and organised as possible. You can read more on the project's repository.
I hope that you've found this guide useful and I encourage you to check it out with your Laravel API projects! It goes without saying, but Enlighten wasn't written by me - it's an open source project headed by Duilio Palacios and Jeff Ochoa.
Thank you so much for reading.